Showing posts with label Collection 2000. Show all posts

Wednesday, 3 October 2012

Cold Remedy

I had a cold last week that really zapped my skin. Here’s the photographic evidence. Eek!

IMG_2315

Happily I’ve come up with a winning team of dull-skin busting radiance enhancers that can perk up my look in no time.

IMG_2333

Above left – right: Illamasqua Cream Blush in Betray; Rimmel Wake Me Up Concealer, Rimmel Wake Me Up foundation

This is my current favourite foundation - I’ve had it for a few months now, although I only wear foundation at weekends so I estimate it would last four to six weeks if used everyday. The consistency is quite thick and creamy and it offers medium coverage with a radiant finish.

The other two products are new but I think they’ll be very handy over the coming windswept days, rainy nights and whatever winter decides to throw at me this year!

IMG_2336

IMG_2340

It just takes a touch of this rosy toned cream blusher to add a healthy flush to cheeks. I use my fingers to apply this then blend out at the edges with a duo-fibre brush.

IMG_2334

I don’t actually usually wear concealer but I did feel so zapped after my cold that I felt I needed a bit of extra help to restore some life to my skin so I decided to try this for under my eyes and any other areas where my skin was suffering. It promises full coverage, but it’s actually much thinner than the matching foundation! I’ve been applying two layers to my under eye area and dabbing a small amount on any rough patches or particularly gruesome spots – otherwise I’m generally happy with the coverage I get from my foundation. I don’t know that I would particularly recommend this – I’ll have to use it for a bit longer before I can decide whether there are any particular benefits to using this in addition to foundation or if it’s an unnecessary extra product.

2012-09-29

IMG_2362

My natural lip colour is very pale, so a bright lipcolour is a quick way to perk my whole face up. Today I opted for a Volume Sensation lipstick by Collection 2000 in shade 4 Plum Perfection. It’s not really volumising, but it does have a shiny finish which always tends to plump things up. I really like the colour though. This is quite a cheap lipstick at £2.99 but it’s pretty good quality for the price. You get a medium coverage, shiny finish that lasts about 3 hours on me.

So, putting all that together, here was the final result today. Ah, much more shiny and happy!

IMG_2414

Monday, 27 August 2012

Everyday Look for Work Summer 2012

IMG_7965

IMG_7966

I’ve been experimenting with neutral eyeshadows a lot more recently but I still like my flashes of colour so this is a great way to combine both.  It’s also super-quick to throw together, so perfect for work, when I only leave myself about 5 minutes for getting ready in the mornings!

Here’s what I used to create this look…

IMG_1863

I don’t bother with foundation during the week and stick to tinted moisturiser instead to save time.  I take out shine down the centre of my face with some powder then whack a light bronzer along my cheekbones (I don’t bother using bronzer to contour and instead just use it to add some colour to my face in the areas the sun would naturally hit first) and a bright blush on my cheeks.

I used Bondai bronzer by Accessorize which I also featured in more detail in my previous post, and my newest MAC blush in Solar Ray (also featured here). There are loads of pictures of it on my blog already but I think it’s really pretty so I’m going to include another one here anyway.

2012-08-27

I have oily eyelids so in hot weather I use a silicone based eye primer to make sure my make-up lasts through the working day. The MUA eye primer is a bargain at £2.50 as it works just as well as other much more expensive primers of this type that I’ve tried before.

IMG_1874

I can’t cope with more than two shades of eyeshadow for work, it just becomes too complicated for me otherwise. Lately I’ve been using shades 4 & 5 from the top row of the MUA undressed palette – I featured many more pics and details in this post. I use the shimmery brown over my lid to the crease then tuck a bit of the matte brown into the crease with a rounded blending brush.

IMG_1876

The hero of this look is in my opinion the amazing green eyeliner – which is now discontinued!!  It’s from the range Glam Metallics by Collection 2000 which were such amazing products that I can’t believe that they were unpopular enough to be discontinued. You get a massive 6ml of eyeliner in the packaging – for comparison most of my other eyeliners are under 2ml.

The brush is thin but the consistency is nice and thick, a combination that makes for a very forgiving application. It’s very waterproof and doesn’t budge on me until I remove it at the end of the day with an oil based eye make-up remover.

2012-08-272

IMG_1884

Finally, when I’m going to work I tend to finish off my look with mascara and a nude lipstick or gloss on the bus. Actually I have developed the really bad habit of carrying about 15 lip products around with me at all times in my handbag – I think I should start concentrating on finishing off a couple to make my load easier to carry! I know some people hate it when they see people doing their make-up on public transport but I say hey, if it gives you an extra 5 min in bed then I’m all for it.

Sunday, 1 January 2012

2 x £6

How much make-up can you get for £6 these days?  Well, it depends where you look I guess.  Normally that’d be enough to get a full priced lipstick or eyeshadow on the highstreet.  In the run-up to Christmas there were lots of special offers to entice me away from my Christmas shopping, and I took advantage of some special offers in Superdrug to come home with these veritable make-up bargains.

First up, Superdrug are (at the time of writing) running an offer for free false eyelashes when you spend £5 or more on Collection 2000 products.  In effect this works out at purchasing two full priced products.  I picked up a glitter eyeliner and a matte lip cream and chose the natural look eyelashes (there was a choice of two designs; natural or volume lashes), which came to around £6 in total – what a bargain!

2012-01-015

The glitter eyeliner has already featured in several posts on this blog as I’ve already become a big fan.  All I really have to say about it is that it’s a good quality, great value product so if you like glitter eyeliners this range is definitely worth checking out.  The only slight issue with this is that the coloured gel that the glitter is suspended in  does stain my skin if worn alone but I’ve been wearing it on top of a normal dark liquid eyeliner and not had any problems with staining.  It’s very easy to remove with either normal make-up remover or face wash.  In the swatch below I’ve applied two coats which as you can see provides dense, opaque coverage.

The lip cream has a lovely consistency – really smooth and moisturising.  It also has a relatively inoffensive, light vanilla scent – which makes a nice change from some of the overpowering fragrances I’ve experienced in some other lip products lately.  The colour, coverage and finish are all lovely, so I would be totally in love with this product if it weren’t for the fact that it fades on me really quickly.  I haven’t been able to eek out more than a couple of hours’ wear from this so far which is a shame as I really want to like it a lot!  I’d love it if anybody has any tips to share on how to get this product to last longer.

IMG_4873

IMG_4855

I have worn the lashes and they were also comfortable to wear with a nice finish – noticeable in an elegant way and not at all overwhelming.  I did have some problems with them poking me in the eye after a few hours but that could be because I didn’t trim them and just wore them as they were in the pack.  I’d take a bit more time to fit them to my own lash line next time.  I don’t even like wearing mascara too close to the inner corner of my eye normally.

Next up Superdrug are also currently (at the time of writing) running an offer for a free eyeshadow palette with any purchase over £6 from the Accessorize cosmetics range.  I’m a big fan of Accessorize cosmetics so I picked up one of their new mascaras which cost exactly £6 and chose the eyeshadow palette in Peony Union Jack.  They do the undeniably cutest  make-up packaging on the high street.

IMG_4876

2012-01-016

IMG_4889

The quality of the shadows is really OK.  There’s no denying that they’re a bit chalky, especially compared to the mono eyeshadows in the Accessorize range which are very creamy, but I really find the colour payoff to be OK to good, and all the shades are definitely useable.  The indigo has the poorest colour payoff but I think it could be made to pop over a creamy primer – something along the lines of the Sleek primer palette perhaps.

I really like the Flutter Curl Mascara.  I accidentally bought the shade black brown as usually I wear only black mascara (as my eyelashes are black anyway) but this shade is really quite dark anyway.  The brush is quite unusual being a multi-layered plastic comb, and is great at defining my lashes (short and sparse).  I use it to either brush through several very thin coats of mascara, or turn it on its side to load my lashes with a thick blob of mascara which can then be brushed through to separate the lashes.  Oh and the packaging is also ultra-cute; a navy tube covered in pictures of brightly coloured butterflies.

2012-01-018

Oh and of course there were make-up bargains a plenty to be had in the post-Christmas sales which I will admit I did indulge in a bit.  Plenty of pictures of my newest make-up goodies will be coming to Chilled Pink Grapefruit soon!

My Christmas Travel Make-up

I went away just for a few days over Christmas itself to visit my boyfriend’s family in Scotland.  We were only there for three nights but I still wanted to channel the festive season in my make-up.  Here’s what I ended up taking.

IMG_4813

I decided just to take this small make-up bag but I had to cheat a little and take my Pixi lumi lux radiance powder too and some make-up brushes which didn’t quite fit into the bag in the end!  Here’s what it all amounted to.

IMG_4817

From left to right

Top row: ecotools eyeshadow brush set; travel mirror

Middle row: unknown eyeshadow; Illamasqua eyeshadow in Vapour; Accessorize blusher in Scandal

Bottom Row: Ecotools retractable kabuki brush, Accessorize jumbo glitter stick in silver, MAC shadestick in Heirloom; liquid eyeliner in purple black and shimmering black; Accessorize Flutter Curl mascara in brown black; Collection 2000 Glam Crystals glitter eyeliner in Shake it up!; No. 7 High Shine lipgloss in Smile, Pixi lumi lux radiance powder.

Most of these products are tried and tested favourites of mine, although the lipgloss was just one that I had lying around that I never really use so I thought I might as well chuck it in the mix.

These are all the Ecotools brushes that I own and I really rate them.  Not only are they well made and totally synthetic (I always feel a bit guilty about buying natural hair brushes), the brush set is also perfect for travelling, with the brushes all having mini handles and coming with its own canvas pouch, and the selection of brushes covering just about any requirements I ever have for eye make-up.  I’m really glad that it doesn’t come with a slanted eyeliner brush because that’s a brush that I hardly ever use but which seems to have become almost a standard for brush sets.  Instead, there are two useful tiny brushes, both of which are handy for smudging and defining.  I think this cost around £13 from Boots.  Not every Boots store contains a great range of Ecotools brushes though unfortunately.  I picked these brushes up in the Boots next to Tottenham Court Road tube station in the summer.

2012-01-011

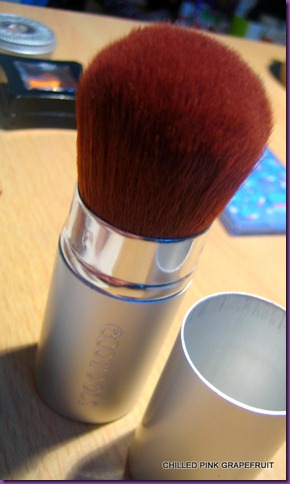
I also picked up the Ecotools retractable kabuki brush at the same time for about £10 and it is now perhaps my favourite make-up brush of all.  I use it for applying my Pixi radiance powder followed by blush every day and it’s also perfect for travelling.  The bristles are so soft and dense that they pick up colour brilliantly with practically no fall out.  This would also be ideal for applying powder foundations.  My only complaint is that it can take ages to dry out after cleaning (I just clean my brushes using soap and water) so I have to either leave it on a radiator when the heating’s on or actually give it a blast with the hairdryer – neither of which I’m sure is very good for the brush itself!
IMG_4826

I’ve gushed loads on my blog so far about how much I love the Accessorize blush in the shade Scandal, though I’ve not mentioned so much how much I love my Pixi radiance powder.  It actually applies as a very sheer, peachy shade which is perfect on my pale skin and it’s very difficult to apply too much, so it’s particularly handy for winter mornings when I end up having to get ready in the semi-dark (I don’t have good lighting in my bedroom alas).  I’ve used it most days since I got it at the end of August and the first signs of the make-up pan are showing through, though even with such heavy usage I’m sure there’s still about six months of make-up left.

IMG_4827

As it was Christmas I obviously had to pack some glitter, being a total glitter feind and all.  I bought the Accessorize glitter stick about a year ago but I think it’s a line that’s since been discontinued from their range, which I think is a shame as they were cheap as chips (about £3 when they first came out, then reduced down to £1.50 in the clearance) and make glitter a breeze to apply.  It’s a stick made up of glitter suspended in a soft, clear wax so you just rub it on your skin and blend out with either fingers or a brush – and not a drop of fall out in sight.  If you’re after denser coverage you can then just top it off by patting loose glitter on top as it’s waxy therefore sticky.  I wear this on my eyebrows, just under my browbone, or around the top of my cheekbones when I feel like a bit of a glitter hit.

2012-01-012

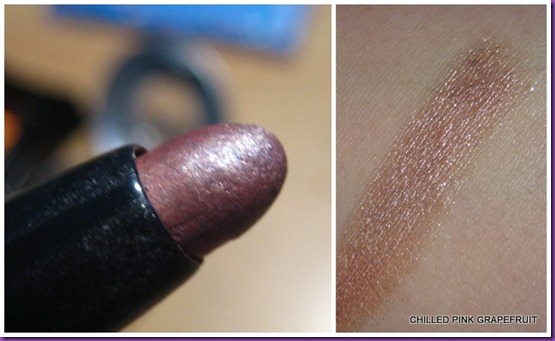
I bought the MAC shadestick this autumn when it came out in one of their limited edition collections, MAC me over.  I’d heard mixed reviews of shadesticks to be honest but they’d been withdrawn from the permanent collection and I was curious to try one.  I paid around £12 as I bought it from Debenhams when they were running a 10% off promo.  Usually they retail in the UK for just over £13.

Although I use this product a lot it’s more to do with wanting to get my money’s worth than being a big fan.  It’s really just OK rather than anything special and I really don’t think it was worth the price.  Shadesticks can be worn alone or as an eyeshadow base, but the consistency is just not creamy or smooth enough and they do drag a bit on application.  I don’t think the shades are particularly special either and when this runs out I’ll simply be replacing it with a Barry M shimmery eye and lip crayon for around £4 from Superdrug – the performance is really very similar.
2012-01-014

I took a few eyeliners as I’m into that kind of look at the moment – pale eyeshadow teamed with winged eyeliner.  These products are just my normal everyday eyeliners plus one glittery one to add a bit of festive bling on top.

I chose one glittery eyeshadow and one brightly coloured matte shade.  I think I wore the pale glittery shade both alone and teamed with the orange in the outer 1/3 of my eyelids when I was up in Scotland.  I think they make quite a nice colour combination, and it’s something a bit different and perhaps unexpected.  This eyeshadow actually used to be my favourite – just look at that big dip in it!  However I’ve since become a bit tired of the terrible glitter fall out that leaves glitter all over your face in places where you perhaps would rather not have chosen to sprinkle tons of glitter.  When this runs out I’ll simply start using my My Face Blingtone eyeshadow in Morococo instead – it’s a very similar sparkly shade with no fall out whatsoever.

2012-01-013

So that’s all I really have to say about my travel make-up - how does it compare to how you got along this festive season?

Saturday, 31 December 2011

Pretty in Synth

It’s New Year’s Eve but I’m not going out tonight - instead I’ll be ringing in the New Year with my boyfriend from the familiar cosiness of our own flat whilst drinking beer and watching movies.  I did pop out briefly earlier to visit a friend for some afternoon tea so I decided to do a pretty purple eye make up look.

2011-12-311

Actually I hardly ever wear eyeliner on my lower lash line, so this look is quite dressed up for me really!  I especially love the combination of the pale shimmery eyeshadow and the glittery eyeliner.  I’ve been wearing glittery eyeliner a lot throughout December because I’ve considered it my “festive” look and I have to admit that I’ll be sorry to say goodbye to it in Jan but I just don’t think it’ll cut it in the office in the midst of all that January drudgery.

Anyway, here’s what I used to create this look. Apologies for the shocking yellow lighting but it was artificial lighting or nothing I’m afraid.

IMG_4789

As you can see I didn’t really use that many products – just one eyeshadow and a few eyeliners then mascara to finish.  I used a navy eyepencil instead of a black because I felt it would go better with the soft lilac and purple eyeliners I had used. 

I consider the two stars of the show to be the eyeshadow which is the shade Synth by Illamasqua and the glitter eyeliner which is the Glam Crystals in Shake It Up! by Collection 2000.  Synth is a pale lilac which has a fantastic multi-tonal shimmer that gives an almost holographic effect on skin.  I tried to capture the shimmer but it’s so much more beautiful in real life.

2011-12-31

The Glam Crystals eyeliner is mainly purple glitter but also contains particles that shimmer red and green.  It is suspended in a slightly coloured gel but I wouldn’t recommend wearing it alone simply because it slightly stained my arm when I swatched it alone the first time I tried it.  However, there’s no problem with staining if you wear it over another eyeliner and in fact I find it easier to create a sharp, defined shape by applying a normal dark liquid eyeliner first.

IMG_4807

Swatches above

Left: Illamasqua eyeshadow in Synth

Right, top to bottom: liquid eyeliner alone, glam crystals over liquid eyeliner, glam crystals alone, navy eye pencil

And finally, here’s a fun Christmassy shot of me posing in my make-up with a tiny reindeer.  Happy New Year everyone!

IMG_4777

Sunday, 31 July 2011

Grass Green Step by Step

This is a rather exciting post for me as I thought I’d attempt to do a step-by-step photo tutorial of my make-up for the first time today.  As I discovered it’s actually pretty tricky to do your make-up whilst attempting to photograph it at the same time, so things might get a bit wonky from here on, but anyway I had fun and that’s the main thing I guess!

I love grass green eye make-up because it feels so fresh, which is perfect for the hot weather we’ve been enjoying here in London this week.  So without further ado, here’s what I got up to today.
Here’s how it all began, with me with just a touch of foundation on.

IMG_0341

I started by applying a thin layer of eye pencil all over my lids as a base.  Mine was a lovely lime green by Gosh which has a nice soft consistency that just glides onto the skin.  I happened to pick mine up 1/2 price in the January sales which was an added bonus but if you like eye pencils then I do recommend Gosh’s as they’re a good buy.
2011-07-311

I stroked a thin layer of pencil all over my lids up to the crease – no need to worry about being neat at this stage.  I then stroked it out to slightly above the crease using my ring finger to create a thin even base.

2011-07-312
I then took a grass green powder eyeshadow on a shading brush and placed the colour on the outer 3/4 of my lid up to the crease.
2011-07-314
OK so now you’ll have created something that looks like this.  Hopefully you can see how I’ve left the inner corner of my eye free from shadow.2011-07-313
At this stage I like to blend the colour from the crease up with a fluffy brush.  I don’t blend the colour that’s on the eyelid as that would just blend the colour out to nothing.
IMG_0367
I like to add a very light reflective colour to the inner corners of my eyes to waken them up.  I like to use quite a lot of highlighter in this area rather than under my brow, starting at the inner corner on the upper lid and blending in an upwards arc into the crease, then taking the colour along the inner 1/3 of the lower lash line.  My current favourite highlight colour is this shiny shiny light green called “Moshi Moshi” from my recently purchased “Cutie” quad by MAC but any light colour will have the same effect of “opening up” the eyes.  I use a slightly rounded pencil brush to apply the colour.
IMG_0408
IMG_0369
OK so at this stage my eyes were looking like this.  I really wasn’t joking when I wrote that I liked a lot of highlighter in this area of the eye ha ha:
IMG_0370
Definitely nice and wide-awake looking I think you’ll agree!  Best blend those colours out a bit so I don’t look quite so stare-y and scarey…
IMG_0371
That’s the main body of the colour taken care of so now I started adding some definition.  I used my lime green eye pencil along the outer 2/3 of the lower lash line, following the line to join it with the colour on my upper lids.
IMG_0372
Next, I ran my favourite green liquid eyeliner along the upper lash line (this was a particularly difficult picture to take!) It’s a Glam Metallics liquid eyeliner by Collection 2000, cost about £3, and is basically fantastic.  If you like coloured eyeliners you must check this range out, they are so easy to apply and really do last all day long (they are waterproof, but easy to remove with a good eye make-up remover).
2011-07-315
I then added some brown eyepencil along the waterline for some added definition and added a couple of coats of my favourite everyday mascara to finish the look, voila:
IMG_0382
I also think that pink cheeks go particularly well with green eye makeup so I like to wear this with a generous dollop of pink blush (shot below with my current favourite mascara, collagen mascara by Accessorize).
IMG_0400
The final effect:
#
That’s all for today folks, hope you enjoyed my first step-by-step look.