Showing posts with label orange. Show all posts

Saturday, 12 October 2013

Double Bright Contrast Eyeliner

Phew, what a name for a post! I think it’s quite apt for this look though. I wore this last week when there were still a few sunny days to remind me of the summer.

IMG_5713

I used my Sleek Eau La La liner in Pumpkin to sketch out the shape of the orange flick first then patted an orange pigment/eyeshadow dust on top with a small flat brush. I then used a creamy turquoise gel eyeliner to draw in the lower flick along my lashline. The look was actually pretty easy to do and I was really pleased with how it turned out. I’m looking forward to experimenting with this eyeliner shape again in different colour combinations.

Let me know if you have any suggestions for colour combinations that you think would work well together!

IMG_5709

On a side note, my eyebrows are completely grown out now. I haven’t touched them for as long as I can remember so I guess around a year now. Sure they look wispy at the edges but to be honest I don’t think they look that bad and I love how low maintenance they are so I don’t have any plans to change my eyebrow regime in the immediate future.

Sunday, 11 November 2012

Orange + Blue Glitter Crackle Nails

I wasn’t actually going to feature these nails on my blog as I painted them mid-way through the week and never thought they’d survive in a fit state until the weekend (now that we’ve turned the clocks back the only time I have enough day light to take any nice photos is at weekends) but who would have thought it – Saturday came and they were still looking pretty good. I’ve said it before, and I’ll say it again – China Glaze No Chip Top Coat, I salute you!

2012-11-10

Both the nail varnishes I used are by MUA; the orange is MUA Love Hearts I WANT U (around £2) and the blue glitter crackle topcoat is Glitter Nail Quake Blue (around £3). I WANT U is a great bright colour, almost neon in fact, but it did apply slightly unevenly. After 2 coats I thought I might as well bung some glitter on top to disguise the uneven finish.

I’ve featured this blue glitter crackle polish on the blog previously here when I wore it over another Love Hearts nail varnish, but that time in purple. I have to say that I much prefer it here. I think it works so much better on slightly longer nails and with a contrasting colour. When I wore it over a purple the colours were just that bit too close to each other and the effect was slightly underwhelming. I think it looks great teamed with this orange though. This is definitely a manicure that I’ll be repeating – especially on days when I fancy some bright colours or a shot of glitter to lift my mood!

Sunday, 23 September 2012

Peach and Green

I think that peach and green is a lovely eyeshadow combination. There’s also something quite autumnal about it – a mixture of the colours of the leaves and vegetables that are coming into season at the moment perhaps, like, um…carrots and pumpkins??

IMG_8187

IMG_8185

I used quite soft shades in this look which I think makes a lovely brightening combo for the daytime, which was particularly useful for me this weekend as I’m recovering from a cold and I felt that my face was looking a bit washed out and dull.

These colours also looks great with more intensity as an orange/forest green combination – I posted a look with those colours here.

Saturday, 15 September 2012

Some MAC Styleseeker for Autumn 2012

MAC have just released a new autumn collection called Styleseeker that’s full of gorgeous tones reminiscent of sunsets, falling leaves and bonfires. I was really keen to get my hands on a few of the shades as they’re a bit of a departure from the vivid blues, bright purples and jewel tones greens that I’ve been sporting this summer and I don’t really wear browns or reds so I thought it would be fun to branch out.

I picked up two of the eyeshadow duos and one of the blushes.

IMG_2169

Above: Eyeshadow Duo in Marché aux Puces (The name is French for flea market). The individual shade names are Chessa (l) and Indie Spirit (r).

IMG_2168

Above: Eyeshadow duo in On the Hunt (individual shades are Star Myth and Raving Mad).

IMG_2177

Above left to right: Marché aux Puces, On the Hunt

2012-09-152

Above: blush in Supercontinental

I’ve only worn Marché aux Puces and Supercontinental so far and I really like both. Marché aux Puces is a bit dry and takes a bit of work to pack onto the eyelids but I love the colour and am glad to have added it to my collection. Supercontinental is a soft peach that gives a lovely natural flush to the cheeks that doesn’t look powdery at all which is one of the nicest blushes I’ve ever tried.

I do think that On the Hunt is going to take a little bit of effort to make it work for me as for one red eyeshadows can make me look like I have sore eyes if I’m not careful and the texture of these shades is quite dry. I’m looking forward to playing around with this duo in any case.

Keep checking on the blog for some looks created using these products – the first one is coming right up after this post.

Sunday, 19 August 2012

MAC Heavenly Creature–Summer 2012

IMG_1461

After the excitement of last week’s outdoor photoshoot (here) it’s back to the indoor photo studio this week – i.e. my living room! Today I thought I’d share some pics of and thoughts on the MAC Summer 2012 mineralize collection Heavenly Creature as I’ve had these products for a month now so I’ve had some time to play around with them.

MAC isn’t really my favourite make-up brand and I find it quite expensive but I was travelling through an airport last month and since I hadn’t really tried much of their mineralize make-up before I thought it was as good an opportunity as any to pick up some pieces from their latest collection. I’ve given the current prices from their website below which include VAT but I paid 20% less at the airport.

I bought a mineralize skin finish (MSF) in the shade Star Wonder (£21.50 for 7g) and a mineralize blush in the shade Solar Ray (£19 for 3.2g).  Let’s look at some photos first before getting down to some number crunching…

2012-08-19

Above left Solar Ray; right Star Wonder

IMG_7891IMG_7896

Above top Solar Ray; bottom Star Wonder
2012-08-191

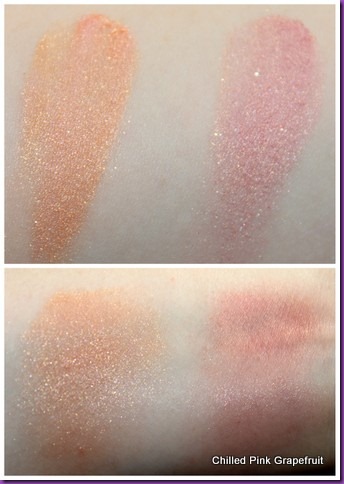
Swatches left Solar Ray, right Star Wonder.  Top swatches intense, bottom swatches blended out.

Both products are very shimmery with Solar Ray being exceptionally glittery as well, which can hopefully be seen somewhat in the skin swatches.  Both products are in fact pigmented enough to be worn as blushes but the price per gram of the blush is £5.94 while the skin finish comes in at £3.07 per gram, meaning that weight for weight it actually works out 48% cheaper than the blush.  Therefore I’d say that if you’re looking for a product that you intend to use a lot your best bet is to go for one of the MSFs – there are four shades available in this collection ranging from light pink to dark plum. I’ve been using Star Wonder as my everyday blush since I got it (you can see it on my cheeks and more pics in this post) and I’m really pleased with both the pigmentation, application and longevity of the product so I would definitely consider buying more MSF in the future.  I do quite like Solar Ray actually because it’s not apologetic – it’s a loud, glittery orange and proud of it!  Unfortunately for me I was wearing this the day they decided to update our staff photos at work so I ended up with an orange face in mine, but I do think it’s good fun.  It’s really expensive compared to the MSF though.

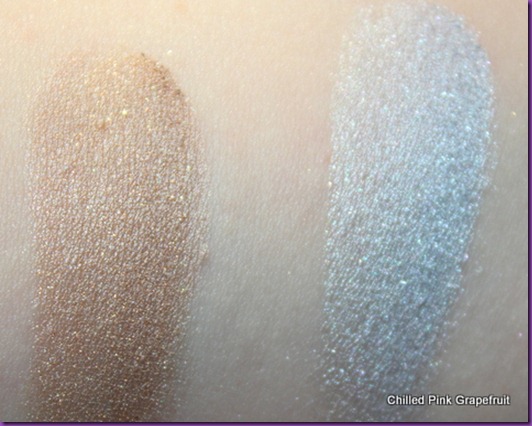
Next up let’s take a look at the two eyeshadows I bought – the medium brown shade Earthly and the light silvery blue shade Bright Moon.

2012-08-192

IMG_1508

IMG_1507

IMG_1509

These retail in the UK at £16.50 for 1.8g. The selling point of these has to be the beautiful swirling pattern of the shadow in the pan - there are three different three distinct veins of colour and shimmer clearly visible in each of these shadows.  Unfortunately though that just doesn’t translate to any complexity in the shadow once it’s applied to the skin – in the swatches above these shadows are inescapably banal; a rather dull mid-tone brown and a very run of the mill light blue.  The colours are nowhere near as interesting as either the blush or the MSF above in my opinion.  They’re good as everyday colours, quick to fling on in a hurry for work as a wash across the eyelids, but not really what I was hoping for given the price point and the beautiful pans. I would have to love the colour a lot to buy another mineralize eyeshadow.

Finally I picked up one of the skincare products in the collection, a face scrub containing volcanic ash.

IMG_1515

IMG_1517

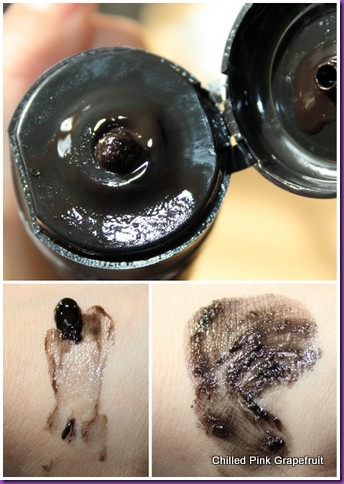
Now despite having studied chemistry at uni I don’t really remember much about it at all but I don’t see many minerals in that ingredients list unless you count volcanic ash and the iron oxides, which are present in the smallest amount of any of the ingredients given that they come last in the list!  The first ingredient on the list is sucrose- yup, plain ol’ sugar. That’s what gives this product its grainy consistency and provides the physical “scrub” as you wash your face with it.
2012-08-193

A little bit goes a long way which I was trying to illustrate above. I actually quite like the use of sucrose because, being water soluble, it dissolves the more you rub it in water, so while the scrub has a very gritty consistency when first applied it soon smoothes out.  Oh and it also tastes sweet if you ever accidentally get any on your tongue! The back of the packaging recommends use once to three times a week. This retails at £21 for 100ml and I would expect this to last me up to six months of use as directed.

Friday, 20 July 2012

Gold Glitter Gradient Nails

Hello again!  I’ve been away on a couple of trips the past couple of weeks visiting people and places so I haven’t updated my blog for a while.  I have loads of exciting new things to show on my blog over the next few days but to start off with I’ve just got a quick post to show the nail design I’m wearing at the moment.

This was super easy to create because the glitter top coat hides a multitude of sins.  I managed to smudged about half of my nails before I applied the top coat but after a couple of coats of glitter and a top coat they were looking perfect again!

IMG_7550

IMG_7552

IMG_7557

I love how fiery and warm the design is – a bit of warmth is definitely welcome at the moment as the weather has really failed to deliver so far this summer!  I used a bright orange Barry M Nail Paint and a Color Club gold glitter top coat.  The Barry M paint was still quite translucent after two coats so the white of my nail tips was still visible, which was an interesting effect (a bit like having orange jelly nails) but this colour is best avoided if you’re after opaque coverage.  However the gold glitter was quite thick so my tips were covered totally by the time the design was completed.

IMG_7568

For tips on how to create a glitter gradient manicure like this I recommend this Youtube video tutorial by Illamasqua which creates the design using black and silver.  Have fun if you decide to give it a go!

Thursday, 8 December 2011

Daytime Pumpkin Eyes

I had the day off work today (hooray!) and came up with this bright but wearable look whilst playing around with my current favourite eyeshadow, Vapour by Illamasqua which I picked up a couple of weeks ago on sale.  It’s an intensely pigmented but very wearable matte orange.  Today I teamed it with a dark green eyeliner.  (Pls see also my Autumn 2011 colour chart for more seasonal colour inspiration).

2011-11-133Above left to right: powder eyeshadow by Illamasqua in Yearn and Vapour – both used in this look

IMG_4339

I applied Yearn over an eyepencil as the dark green eyeliner.  I’m also wearing my favourite cold weather blush in Scandal by Accessorize, which looks very red in the pan but applies to the skin as a lovely subtle golden rose shimmer.

IMG_4341IMG_4347

I’m wearing some funky golden monkey drop earrings that I picked up on sale in Topshop a couple of months ago.  I have buckets of crazy costume jewellery like this already but I just couldn’t resist these when I saw them!

IMG_4342

I just wanted to do a quick post tonight but I’ll hopefully be back tomorrow with some amusing shots of some of my latest crazy hair/head accessories.

Saturday, 23 July 2011

Orange Eyeshadow I: Metallic

I saw a pic in a magazine of a model wearing orange eyeshadow blended into white above the crease this week and I thought it was a great colour combination for the summer.  I don’t wear orange eyeshadow that often – I could probably count the number of times I’ve worn orange eyeshadow this year on one hand – but there was a lovely metallic shade in the Sleek Curaçao palette that I thought would be perfect to try out for a similar look.

 IMG_9845

clockwise from top left : apres midori, tequila sunrise, martini, blue lagoon

Here’s what I came up with:

IMG_0275IMG_0278

My favoured make-up application method is literally to slap it on as I’m very lazy about blending, so this look is perfect for me.  There’s no complicated blending involved at all.  I used Urban Decay Primer Potion all over the lid (the colours are all still going strong now 10 hours later), blended a shimmery white (the shade Martini also from the Sleek Curaçao palette above) into and just above the crease and inner corner, then applied the orange shade to my lid and blended out.  I blended a medium matte brown shadow along my lower lash line and finished with two coats of mascara for added definition.  If I hadn’t been being so lazy I think some brown eyeliner along my upper lash line would have looked good as some extra definition as well.

You can see how un-blended this look is in the shots below which were taken at a different angle.  I think I managed this make-up in under 10 min.

2011-07-23

I have to admit that I have been growing my eyebrows as I think some women look great with slightly untamed brows…but to be honest looking at these photos I don’t think it’s a very flattering look for me!

I did enjoy wearing this shimmery orange today, but even though I wore a tiny bit of bronzer on my face I think I still looked a bit washed out because I didn’t have any colour on my lips.  I think this would go nicely with any of the lovely neutral lip colours I bought from Gosh last week.  I think I’m also going to try this colour combination with matte shades to see which eyeshadow finish I prefer – photos will follow once I’ve tried it out.