Showing posts with label nails. Show all posts

Monday, 14 October 2013

Septemberry 3: Berry Nails

Oh dear, my September-berry project seems to have over run by a couple of weeks – I still have this photo of berry nails to share and another berry lipstick look still to post and it’s already the middle of October! I think berry tones still fit the season perfectly though so at least it’s not too late to hopefully be inspired by the photos that I have left :)

This luscious berry nail polish is in Illamasqua’s rubber finish, a strange matte-shine hybrid that really does create the effect of rubber. This is the shade Vice, a deep raspberry red. Two coats gave opaque colour that matched the bottle. I skipped top coat (except for the nail with the rhinestones) as that would have created a shiny finish, but I still wore this for five days with only minor signs of wear. The colour didn’t transfer onto objects that I happened to accidentally swipe my nails across, either, which sometimes happens with bright colours if I don’t wear a top coat.

IMG_8798

I dropped some rhinestones onto my ring finger while the nail polish was still wet just for fun and applied a top coat to help them last longer which is why that nail is shinier than the others. Overall I really liked the effect and I’ll definitely be wearing this nail varnish again this autumn.

Sunday, 22 September 2013

Nails to Match the Weather: Autumn 2013 Edition

Brrr, it is definitely feeling very autumnal here in Edinburgh already. I was hoping for a warm autumn but while the sun is still shining it’s been soooo windy here this week! The chill in the air put me in the mood for a grey nail polish and I went for this shade that I’ve had for a couple of years now but haven’t featured on my blog before.

The fact that I haven’t featured this polish before is really an oversight on my part as it’s a great nail polish. It has a perfect consistency, dries fast and lasts for around a week on me without chipping.

Below: Bourjois 10 days No Chips nail polish in shade 23

IMG_8765

IMG_8759

Saturday, 14 September 2013

Accessorize Leopard Moth

IMG_8750

Above: In the bottle

Below: On the nails

IMG_8747


IMG_8755

This is a great glitter effect nail polish from Accessorize that you can pick up for just a few quid. I bought it when the entire range of polishes was 2-for-£5 in Superdrug; individually they normally retail for £3.45.

The consistency is good and smooth and I’m wearing three coats in the photo above although the coverage is almost opaque after two – I just wanted to load my nails with glitter. This type of polish can be problematic when it comes to chipping (glitter nail polishes always seem to start chipping off in chunks on me after a few days) so I do recommend wearing this with a top coat. So far I’m on day 2 with only minor chips on one nail.

Sunday, 5 May 2013

Germany 2012 – The Rest!

So here it is, only 4 months after my trip – a post on all the beauty goodies that I picked up when I was in Hamburg way back in Dec!
IMG_4365

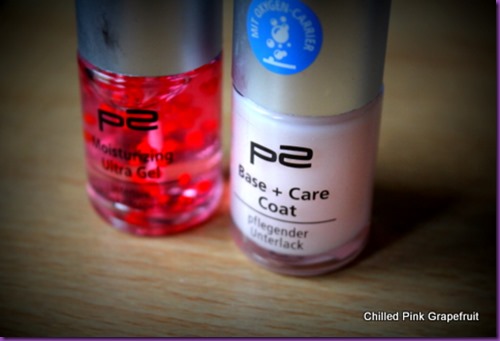
P2 Moisturizing Ultra Gel (cuticle conditioner) and Base + Care Coat.

P2 is a German drugstore own brand that have some great products at amazing prices. Both these products cost around EUR2 each and this is actually the second bottle of the base coat that I’ve bought. I bought my first one a few years ago and thought it was so good that I used it all up, so I was very happy that I had an opportunity to restock.

IMG_4371

I haven’t actually used the Moisturizing Ultra Gel that much yet although I should because the reason that I bought it is that I suffer from dry cuticles. So I just have to hope that it lives up to its claim of being “intensiv feuchtigkeitsspendend” (intensely moisturising). I love how it looks in the bottle too with its tiny floating vitamin E dispensing red beads.

IMG_4377

I discovered a new brand of nail polish on this trip in a pharmacists (or drugstore, if you prefer!) called Budni. The Blackbird line of nail polishes costs EUR2.49 per bottle and is shelved in displays that look like birdhouses – cute! I’ve worn both these colours several times now and can heartily recommend them. You can see my swatches of the chocolate brown I Need You here and my swatches of the Azure blue Free As A Bird here.

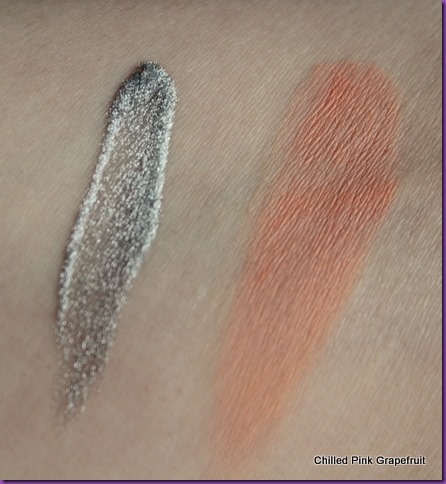
I also picked up a couple of random items from some limited edition autumn/winter collections: a peachy coloured cream blush by the brand Catrice in the shade Rose’s Wood (Siberian Call collection) and a silver lipgloss again by P2 (Keep the Secret collection).

2013-03-302

2013-03-306

IMG_4411

The lipgloss is amazing; it’s really thick and pigmented and can be worn either as a very sheer layer to add a subtle glow to the lips or in a thicker layer as in my swatch above for opaque coverage. Definitely my kind of lipgloss.

The blush was a bit of an impulse buy as I’m not usually a fan of drugstore cream blushes but I’ve been pleasantly surprised by the longevity of this one so far and I’ve discovered that the subtle shade is the perfect way to add a touch of colour to cheeks without overwhelming the face if worn with stronger eye or lip looks.

Next up, my personal beauty obsession – eye make-up! I bought: 3 powder eyeshadows, 2 eyeshadow bases, an eyeshadow stick and a mascara. Phew!

2013-03-307

Above: Emporio Armani Eyes to Kill eyeshadow in shade 1 Blast of Blue (reduced from EUR30 to EUR15, hurray! Purchased at the Gaensemarkt Parfumerie, Hamburg)

IMG_4437

Catrice Instensif’Eye Wet and Dry eyeshadow in 050 Lunch at Tiffany’s, around EUR4

IMG_4443

Essence Home Sweet Home LE collection eyeshadow in 02 Light the Fire, Place! ca. EUR2

I do like the shade but I have to admit that I mainly picked this up because of the super cute knitted pattern!

IMG_4445

Above, left to right: Giorgio Armani Eyes to Kill in Blast of Blue, Catrice Intesif’Eye in Lunch at Tiffany’s, Essence eyeshadow in Light the Fire, Place!

My favourite shadow is the Catrice one; it’s wonderfully pigmented and easy to apply and blend, and it’s such an easy colour to wear. I got plenty of wear out of it through the winter, but I haven’t worn it so much lately as my attention has turned to brighter colours for spring and summer.

IMG_4705

I haven’t actually worn the Armani (above) much at all, despite it being a lovely colour, because it’s very deep and intense and more an evening/night time colour for me and I haven’t gone out that much lately. I am going to make more effort to wear it though as it is definitely one of the most expensive single eyeshadows I own, yet somehow it still seemed to be an absolute bargain as I bought it as it was half price!
IMG_4474

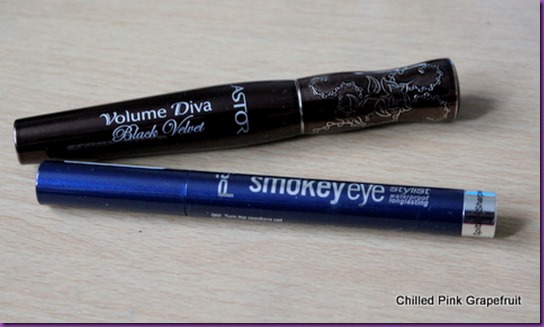
Above: Astor Volume Diva Black Velvet Mascara (ca EUR10), P2 Smokey Eye Stylist automatic cream eyeshadow stick (ca EUR3)

Again I did just buy this mascara for the beautiful packaging (but in my defence, I also had happy memories of good Astor mascaras that I owned when I lived in Germany years ago). The metallic-effect lid has beautiful "carvings” of roses in it.

2013-03-309

I almost like this mascara – the packaging is beautiful and it comes with just the kind of wand that works well on my stubby lashes – a sparse, narrow wand that simply dumps loads of product onto the lashes for a nice volumising effect, but unfortunately this mascara smudges on me, so it’s never going to make it into my favourites.

I don’t even know why I bought this eyeshadow stick, but it found itself into my shopping basket all the same. I think I must have gotten to the point where I was just grabbing products! I do use eyeshadow sticks and pencils but they’re usually in light colours, and I use them as eyeshadow bases. I also use this as an eyeshadow base, so I can’t really testify as to how it holds up when worn on its own, but it does do a nice job of keeping my eyeshadow in place so I have no complaints. It also works well as an eyeliner – you can create a very thick line or use the in-built sharpener (pull the silver end off the pencil) to create a fine point to draw thinner lines. Oh and I should mention that it has a lovely creamy consistency so it doesn’t drag across the lids as you apply it at all.

IMG_4469

And finally, the last two products of my somewhat random selection are two eyeshadow bases, again both by the brand P2.

Keep the Secret was a limited edition collection from Autumn 2012 – the silver lipgloss pictured above was also from this collection. Unfortunately the best thing about the Desirable Eye Base is the rather solid feeling glass packaging, as I’ve found it to be a bit of a flop as far as being an eyeshadow base is concerned. It reminds me a lot of Maybelline dream mousse foundation in both its colour and consistency, and didn’t seem to make any difference to the longevity of my eye make-up at all, which was sliding around all over my lids after just a few hours when I tried it over this.

I have higher hopes for the P2 Perfect Eyes! base which has somewhat simpler packaging but a plethora of positive reviews on the blogosphere already. However, I’m yet to give it a thorough road test myself. It’s part of the permanent collection though so I should definitely test it out before my next trip to Germany so that I know whether I need to restock or not!

2013-03-308

Tuesday, 23 April 2013

Blackbird Nail Varnish in 09 I Need You

This is the second Blackbird nail varnish that I bought when I visited Hamburg in December. You can see Free As A Bird, a brilliant azure blue, in this post.

Both polishes are great value for money, with a nice, creamy consistency that’s opaque in two coats and lasts on me with a top coat chip free for up to four days. You get 8ml for €2.49 – sadly for us UK based nail varnish fans though this is only available in Budni stores in Germany as far as I know. One to look out for if you’re ever in the area though!

2013-04-02

I need you is a creamy brown that makes my nails look like chocolate buttons, mmm…

Sunday, 14 April 2013

Crazy Coloured Nails for Spring

I should definitely feature more nail posts on this blog. I have so many nail polishes and my nails are painted more often than not, but I think I’m probably too fussy when it comes to taking pictures of my nails.

There was the extra-long winter to contend with this year I suppose, which was a constant battle against strangely blue-toned light in all my photographs. And then there are the occassions such as today when I painted my nails with an awesome nail varnish and then, through no fault of the product but rather due to my own impatience and inability to sit still for more than two minutes I managed to smudge and dent it all over the place.

Case in point, Illamasqua’s nail polish in Radium, a shimmery toxic lime green:

IMG_4573

This nail varnish has the perfect consistency, is opaque in two coats and dries fast in about ten minutes. I am simply a dope.

I didn’t want to add a third coat of Radium though so I thought I would try to save the day with a coat of crackle nail polish. This is really where crackle nail polish comes into its own, I think. Barry M’s crackle top coat in blue really saved the day.

IMG_4575

Bam! Now that’s what I call colour. This is a seriously funky colour combination and the crackle hides all those pesky dents and smudges perfectly. Phew!

Saturday, 30 March 2013

Easter Manicure

If you’re looking for some Easter inspiration for your nails then I’ve got two polishes to show you today that might be just what you’ve been looking for.

IMG_4233

Above left: Invogue feather polish in on the money (£3.49), right: Revlon nail enamel in 260 Girly (£6.49)

invogue is quite a new British brand that’s just launched in selected Superdrug stores and the Superdrug website. They have an assortment of different “special effect” nail varnishes with this one being a “feather effect”. It contains hundreds of thin coloured plastic strands in a clear nail varnish that are supposed to create the look of a feather on the nails. I’m not really sure that it looks like a feather, but I do think that it looks quite cool on. I applied two coats to achieve this opaque finish. Just a quick word of warning – the plastic particles are actually very sharp, so be sure to give the end of your nails a quick file once the polish has dried to prevent any accidental painful scratches or eye poking!

I thought that “Girly” was an interesting concept – different coloured glitter particles suspended in a semi-opaque polish. I applied three coats to get true-to-bottle colour payoff. I love how my nails now look like sweeties – perfect for the Easter weekend!

2013-03-29

As you can see from the photos above, my cuticles have been suffering something rotten in the recent cold spell we’ve been having here in the UK. I’m trying to rescue them with cuticle oil but I just never get round to applying it often enough, poor cuticles!

Sunday, 24 March 2013

The First of My Germany 2012 Posts

Well, it’s only taken me 3 months to sit down and write this first one, but now that I’ve started hopefully I will get round to posting the rest within a slightly shorter time period!

I visited Hamburg for a weekend Christmas shopping break in December and took the opportunity to pick up a whole stack of cosmetics while I was there. It sounds awfully decadent when I write about visiting like that but short trips to the European Christmas markets are quite a popular kind of holiday!

Whenever I’m in Germany (every other year or so) I love to buy cosmetics that aren’t available in the UK. First up I have a shot of a nail varnish that I bought from a drugstore, I can’t remember the name of the shop (I think it was Budni) but the brand is called Blackbird and all their colours cost €2.49 for 8ml. I was actually umming and ahhing as to whether or not I should buy any more nail varnish as I had bought so much recently but for the price I eventually decided that even if the quality wasn’t great it wouldn’t put too make too much of a dent in my holiday budget so I bought two colours. Today I have a shot of me wearing No. 6 Free As a Bird, a brilliant azure blue.

The consistency is perfect – not too runny and not too thick, quick drying and opaque in two coats. With a top coat I get about four days wear which for the price is a pretty good show.

IMG_8392

Monday, 28 January 2013

Some Bargain O.P.I and Butter London

I popped into TKMaxx last week and picked up two things that I really didn’t need – more nail varnish and more lip gloss! They looked pretty and sparkly though so I decided to treat myself. I haven’t worn the nail varnishes yet but I thought I would posts some pics of the products anyway in case anybody is interested in checking out their local TKMaxx to see if they have them in stock.

I picked up an OPI duo with full sized bottles of the shades Pirouette My Whistle (silver glitter) and Lucerne-tainly Look Marvelous (multi-shimmer charcoal), with a diamante encrusted pen thrown in for good measure. I have to admit that the pen is quite fetching if you like your bling!

According to TKMaxx’s price sticker the RRP of this set is £17.50 but I picked it up for £12.99. I was just thinking that the last (and only) time I bought a full priced OPI nail polish it cost me around £11 so since I really like both these shades this was certainly a bargain.

2013-01-271

They also had quite a few nail varnish and lipgloss sets by Butter London. It’s a brand that I’d heard of but never tried before. I know that they are primarily known for their nail varnishes but I thought I’d branch out and pick up this gloss trio, which at £9.99 (RRP £21 according to the price sticker) worked out at £3.33 per gloss which I thought was OK.

The colours are quite sheer but are nice and shimmery. They’re quite sticky but I don’t mind sticky gloss as I find it tends to last a wee bit longer on my lips. The colours offer a lovely selection for daytime wear – I think they’re a bit too sheer and subtle for evening. I wouldn’t pay £21 for this set but at £9.99 it’s OK.

IMG_3585

Here are a couple of shots of swatches on my arm so you can appreciate the sparkle a bit.

2013-01-273

Left to right: Frilly Knickers (white-blue shimmer), West End Wonderland, Rosie Lee

Wednesday, 14 November 2012

Shiny Ice-Cream Nails

Just have a quickie mid-week nails post today. This is my MUA nail varnish in Pistachio Ice Cream (£1) with a sparkly iridescent blue top coat by Andrea Fulterton.

2012-11-11

Top: two coats of MUA nail varnish in Pistachio Ice Cream

Bottom: with sparkly top coat from Andrea Fulerton Nail Boutique trio in Petrol in the Water.

This is the first MUA nail varnish from their £1 range that I’ve tried and to be honest, it’s pretty good for £1. The bottle is quite small at 6.2ml, but I actually quite like small bottles of nail varnish as I practically never finish full sized bottles off before they start going gloopy anyway. Unfortunately that does make the brush quite small and fiddly, and to be honest it’s not the best quality and a bit splayed, but as long as you take your time you can still paint your nails with it fine. The colour was opaque in 2 coats.

I really like this Andrea Fulerton polish. It’s a duo-ended bottle and you can use either colour separately or paint the top coat over the darker shade to create a completely different third colour. I will definitely feature some pics next time I wear this because the name is spot on – it really does look like the polarised reflections you see with Petrol in the Water.

Sunday, 11 November 2012

Orange + Blue Glitter Crackle Nails

I wasn’t actually going to feature these nails on my blog as I painted them mid-way through the week and never thought they’d survive in a fit state until the weekend (now that we’ve turned the clocks back the only time I have enough day light to take any nice photos is at weekends) but who would have thought it – Saturday came and they were still looking pretty good. I’ve said it before, and I’ll say it again – China Glaze No Chip Top Coat, I salute you!

2012-11-10

Both the nail varnishes I used are by MUA; the orange is MUA Love Hearts I WANT U (around £2) and the blue glitter crackle topcoat is Glitter Nail Quake Blue (around £3). I WANT U is a great bright colour, almost neon in fact, but it did apply slightly unevenly. After 2 coats I thought I might as well bung some glitter on top to disguise the uneven finish.

I’ve featured this blue glitter crackle polish on the blog previously here when I wore it over another Love Hearts nail varnish, but that time in purple. I have to say that I much prefer it here. I think it works so much better on slightly longer nails and with a contrasting colour. When I wore it over a purple the colours were just that bit too close to each other and the effect was slightly underwhelming. I think it looks great teamed with this orange though. This is definitely a manicure that I’ll be repeating – especially on days when I fancy some bright colours or a shot of glitter to lift my mood!

Tuesday, 30 October 2012

Gemini MUA Manicure

MUA recently launched a range of five different colour-combos of micro-beads for nails called Nail Constellations. I ordered a couple of shades online as I was finding it difficult to track them down in any Superdrug stores and the other day I experimented with giving myself a manicure using the lilac/peach/green shade Gemini.

2012-10-281

IMG_2822

Above: the beads look like cake sprinkles in the bottle – but will they make my nails look just as yummy?

IMG_2824

I chose a light purple colour to use as my base shade. The base shade will peep through the beads and especially when they start to fall off so you should choose a colour bearing this in mind.

The first time you use the Nail Constellations you have to remove the plastic top of the bottle and remove the safety sticker. This is actually a bit of a delicate task and there will be some spillage no matter how careful you are so choose your location carefully!

The beads were surprisingly easy to apply. I painted all my nails with one coat of nail varnish. I then painted quite a thick second coat on my thumb nail and immediately poured the micro-beads over my nail. I did this over a rectangular piece of plastic packaging to catch all the spillage. The beads stuck to my nail quite well and there wasn’t actually as much spillage as I was expecting. The top of the bead container is quite narrow so only a few beads are dispensed at a time. I did have to keep tipping it upright then upside down again to maintain the flow of beads. When I was happy with the coverage on my thumb nail I gently used the pad of my index finger on my other hand to very gently press the beads down into the nail varnish. I then repeated with my ring finger then painted all my other nails with a second coat of purple.

I only painted the tip of my beaded nails with topcoat, as the colour of the beads is soluble and fades when they come into contact with top coat.

I then simply took the top off the bead container and held it upside down inside the bottle to use as a funnel that I poured the excess beads that I had caught in my rectangular plastic container back into.

I was really pleased with the results; I think my beaded manicure looks really cute. Unfortunately it’s not a long-lasting finish and many beads fell off within a few hours, and nearly all of them were gone by the following morning. I would definitely use topcoat over the whole nail next time and not just the tips in spite of the slight fading in colour as the remaining beads had faded a lot by next day anyway. I had heard before that this kind of manicure only lasts for a couple of days so I wasn’t too disappointed. I will definitely do this again next time I’m going out to meet my friends as I know they will love it when they see it – we are all big fans of cake and my nails look like they’re covered in sprinkles!

IMG_2826

IMG_2836

IMG_2831

Tuesday, 23 October 2012

China Glaze All That Glitters

I just can’t resist a good dash of glitter… that is how I ended up walking past Sally’s Hair and Beauty one minute, and coming out with SEVEN new nail polishes five minutes later – eek!

I got two sets from China Glaze, one a Ho Ho Ho trio (£12.99) which I’ll write a post on later and the All That Glitters set of 4 mini colours (£9.99). Full size China Glaze polishes are 14ml and each of the minis are 9.6ml which is actually a perfect size for me as I never manage to use up nail varnishes before they start going gloopy.

IMG_2644

IMG_2653

IMG_2654

I love all of these colours and I’m definitely going to get a lot of use out of all of them this autumn and winter. Today I started off by trying out Glitter All The Way, a gorgeous dark, cool toned multi-coloured glitter containing indigo, gold, green and red. Here I’m wearing two coats plus a top coat.

IMG_2687

I’d say that with two coats the coverage is pretty much opaque, so there’s no need for a coloured base underneath – although there were a few tiny gaps here and there, but they’re really not noticeable from a short distance. The glitter particles lie nice and flat on the nail and with a top coat the finish isn’t rough at all.

I’ll update this post with nail shots of the other shades as I wear them.

03/11/2012

Here’s the first update! Champagne Kisses is a gorgeous beige glitter, containing so much shimmer it’s bordering on holographic. The finish is a bit gritty due to all the glitter but the finish is good – I went 2 days before I got some minor chipping, but I could definitely wear this for 4 to 7 days before needing to redo my nails.

2012-11-03

Saturday, 20 October 2012

Illamasqua Nail Varnish in Stagnate

The biggest problem that I have with this nail polish is that it looks so yummy I just want to start nibbling at my nails whenever I wear it! I prefer to ignore the slightly icky name (just makes me think of a swamp!) and think of it as a deliciously creamy chocolate brown that looks lovely in autumn, when it fits right in with all the earthy muted tones of moulting trees, muddy lawns, rainy days and early evenings.

IMG_2597

Above: two coats of Stagnate, no top coat.

The consistency is perfect, not too thin and not too thick, and the colour is opaque in two coats. I get at least a week’s wear out of this shade if not longer – without  any chipping. I always wear it with a China Glaze top coat. Illamasqua nail varnishes are expensive at around £13.50 a bottle but they are often on special offer and I actually picked this one up on sale for £5 a few months back – woohoo! If you don’t fancy paying full price for their nail varnishes but are interested in picking some up I recommend checking out their January sale (not that much longer to wait now – only two more months till Christmas now after all!)

Tuesday, 16 October 2012

Hello Kitty Arrives at Superdrug

Well, hello there Kitty…

IMG_2520

I’ve been excited about this make-up launch since I heard about it over a month ago. I do love my ridiculously kitsch make-up.

The Hello Kitty Superdrug range features a selection of lipsticks, nail varnishes, eyeshadows and more in Hello Kitty packaging. I could have bought so much when I first came across the stand, but I limited myself to one lipstick and one nail varnish so that I could see if the make-up was actually any good, or if they were all just about the gimmicky packaging.

I got a lipstick in Betz Believe, a bright coral pink, and a nail varnish in Respect, a glossy navy. I’ve been wearing them for the past week now and I have to say, considering that they both cost less than £5 and have such funky packaging I’m impressed by the quality. The lipstick is creamy and pigmented and lasts about 4 hours on me, and so far the nail varnish, which only required one coat, has gone 4 days without chipping (though a lot of thanks also has to go to my China Glaze top coat).

IMG_2522

IMG_2525

IMG_2555

I’m definitely going to be going back for more lipsticks and nail polishes, and I think they’d also make great gifts for anybody into their cute stuff.

Friday, 28 September 2012

Funky Nails by MUA

IMG_2259

So I finally got round to painting my nails with the fantastic colour Love U 24/7 by MUA, which is a creamy opaque purple that I bought back in the spring. The pic below is of two coats, no top coat. I think it’s a great little nail varnish for £2 and really recommend it if you like the colour. I can get 4 days wear out of this no problem in conjunction with my China Glaze topcoat.

IMG_8060

I also had an MUA glitter crackle top-coat that I was eager to try out so I popped some on top.

IMG_8089

Now, this product does crackle as promised but I’m not sure if I really like the final effect. I think the glitter needed to be a teeny bit more pigmented, as it wasn’t that obvious that it was anything other than a normal glitter topcoat from a distance. I do think that it worked better on my other hand where my nails are longer (see very top photo), so perhaps I’ll wait until all my nails are a bit longer before trying this out again. I also think I didn’t quite get the colour combination right, as the blue got a bit lost within the purple, so next time I’ll go for a contrasting undercoat in a gold, orange or brown.